Dyeing leather is a craft that can transform your leather goods into vibrant, personalized pieces. To dye leather, start by selecting a suitable dye based on your desired color and leather type. Dyeing leather requires thorough cleaning and preparation to ensure the dye adheres evenly. Use a leather deglazer to remove any existing finishes. Apply the dye evenly using a sponge, brush, or spray, depending on the desired effect. Multiple coats may be necessary for deeper colors. Allow each coat to dry thoroughly before applying the next. Finally, seal the leather bag with a protective finish to enhance durability and longevity.
Before you embark on dyeing leather to change leather color, it’s crucial to prepare your workspace. Begin by laying down protective covering to prevent any accidental spills or stains. Gather all necessary materials such as dye leather of your choice, applicators, cleaning solutions, and gloves. Ensure proper ventilation in your workspace to dissipate any fumes from the dyeing process. Organize your tools for easy access and set up a clean, flat surface to work on, preferably near a water source for cleanup. With your workstation ready, you’re all set to embark on your colouring leather project, whether it’s a leather journal or another cherished item.
To embark on dyeing leather and changing leather color successfully, assemble the essential tools and materials. Start with your chosen dye leather in the desired shade, ensuring it’s compatible with your leather type. Acquire applicators such as brushes, sponges, or sprayers for even application. Prepare cleaning solutions like leather deglazer to remove any existing finishes. Don’t forget protective gear such as gloves and a leather apron to shield yourself from potential stains. Organize your workspace efficiently to facilitate the colouring leather process. With these items gathered, you’re ready to transform your leather goods into personalized masterpieces.
Before dyeing leather to change leather color, it’s essential to properly prepare the surface. Begin by identifying the type of leather you’re working with, as different types of leather may require specific preparation methods. Clean the leather thoroughly to remove any dirt, oils, or finishes that could interfere with the dyeing process. Use a suitable leather cleaner or deglazer for this purpose. Ensure the leather is completely dry before proceeding to apply the dye. Proper preparation ensures optimal adhesion and color absorption, resulting in a successful colouring leather project.
Before dyeing leather to change the color of leather, it’s beneficial to lightly spray the surface with water. This step helps to open up the pores of the leather, allowing for better absorption of the dye. However, it’s crucial to use caution and avoid oversaturating the leather, as excessive moisture can lead to uneven dyeing. Additionally, ensure that you’re working with real vs fake leather, as the dyeing process may differ between the two materials. By moistening the leather before applying the dye, you’ll enhance the effectiveness of the colouring leather process and achieve more consistent results.
Before dyeing leather to change the color of leather, it’s crucial to thoroughly clean the surface by wiping it down. Use a clean, damp cloth to remove any dust, dirt, or residues that may hinder the colouring leather process. Pay special attention to creases and seams where grime tends to accumulate. This step not only ensures better adhesion of the dye but also promotes an even application and consistent color absorption. Properly cleaning the leather is an essential preparatory step in the dye leather process, leading to more satisfactory results in your dyeing leather project.
When considering how to dye leather and change the color of leather, cutting your dyes refers to diluting or mixing them to achieve custom shades. This step is particularly useful when aiming for unique or specific colors in your colouring leather project. Diluting your dyes allows for lighter hues, while mixing different colors enables endless possibilities for customization. Experiment with varying ratios and combinations to achieve your desired results. Cutting your dyes empowers you to unleash your creativity and transform your leather goods into personalized masterpieces during the dyeing leather process.
In the process of dyeing leather to change the color of leather, applying a base coat is a crucial step. This initial layer acts as a foundation for the subsequent dye layers, ensuring a more uniform and vibrant result in your colouring leather project. Choose a base coat color that complements or enhances the desired final hue. Apply the base coat evenly using a brush or sponge, covering the entire surface of the leather. Allow the base coat to dry completely before proceeding with additional dye layers. This step sets the stage for a successful how to dye leather process, yielding professional-quality results.
After dyeing leather to change the color of leather in your colouring leather project, allowing the leather to dry thoroughly is essential. This step ensures that the dye sets properly and prevents smudging or uneven color distribution. Depending on the type of dye used and environmental conditions, drying times may vary. It’s crucial to exercise patience and avoid handling the leather until it’s completely dry. Proper drying is a critical aspect of how to dye leather effectively, as it contributes to the longevity and durability of the color. Once dry, your dyed leather will be ready for further finishing touches or use.
In the process of dyeing leather to change the color of leather, adding more thin coats of dye enhances the depth and richness of the color in your colouring leather project. Thin coats allow for better control over the intensity of the color and help to achieve a more even application. Apply each coat evenly using a brush or sponge, ensuring thorough coverage while avoiding excess saturation. Allow each coat to dry completely before applying the next layer. This method of layering thin coats is a key aspect of how to dye leather effectively, resulting in professional-quality results with enhanced durability and color vibrancy.
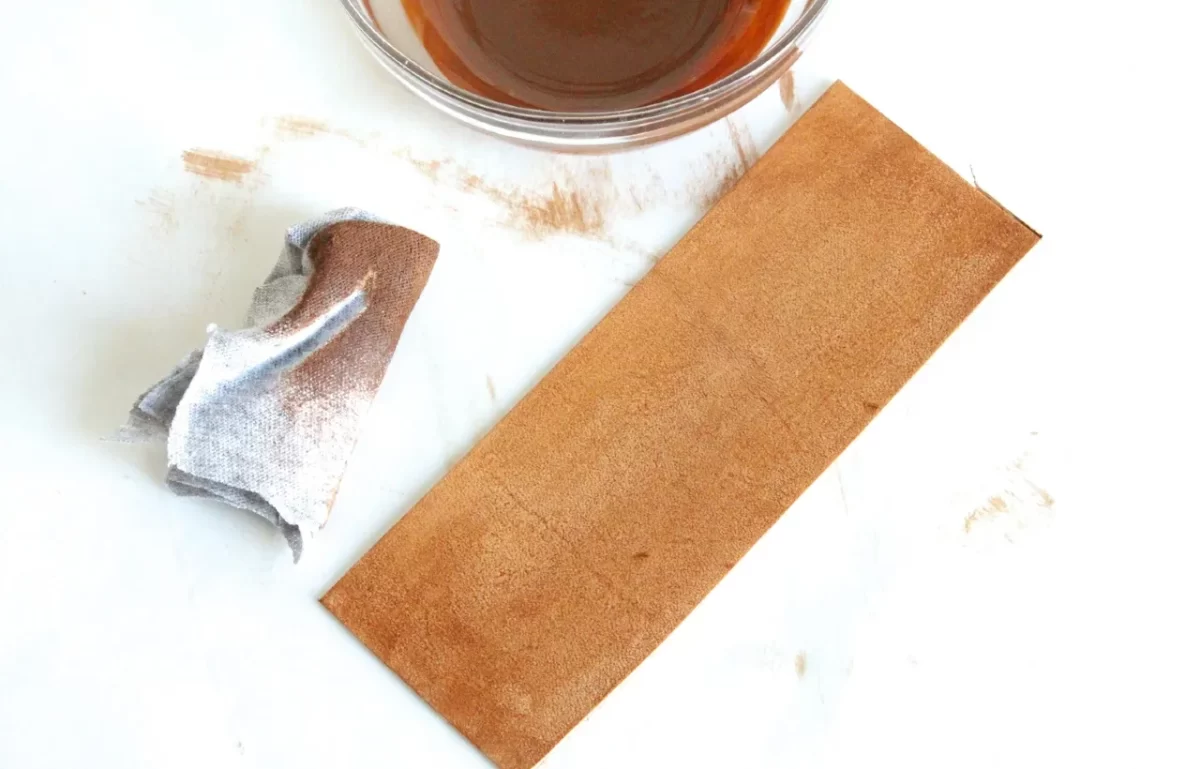
Following the application of dyeing leather to change the color of leather in your colouring leather project, buffing the leather is a crucial step in achieving a polished finish. Use a clean, dry cloth or buffing brush to gently rub the dyed surface. This process helps to remove any excess dye and smooth out any uneven areas, resulting in a more uniform appearance. Buffing also enhances the shine and luster of the leather, giving it a professional and refined look. Incorporating this step into your how to dye leather process ensures that your dyed leather goods are not only beautifully colored but also impeccably finished.
When considering how to dye leather and change the color of leather, follow these essential tips for successful colouring leather projects. Firstly, always clean the leather thoroughly before dyeing to ensure optimal color absorption. Test the dye on a small, inconspicuous area first to gauge the color outcome. Apply multiple thin coats of dye for a more even and professional finish. Allow each coat to dry completely before adding the next layer. Additionally, use protective gear like gloves to avoid staining your hands. Following these tips enhances the effectiveness of your dyeing leather process, resulting in beautifully colored leather goods.
In conclusion, dyeing leather to change the color of leather opens up endless possibilities for colouring leather to suit your preferences and style. Understanding how to dye leather effectively involves proper preparation, application, and finishing techniques. By following the right steps and utilizing the appropriate tools and materials, you can achieve professional-quality results. Whether you’re revitalizing old leather items or customizing new ones, mastering the art of dyeing leather allows you to express your creativity and personalize your leather goods. Embrace the process, experiment with different techniques, and enjoy transforming your leather chair into a unique and vibrant piece.
FAQs
You have several options for dyeing leather. Leather dyes specifically formulated for this purpose are widely available and come in various colors, offering vibrant and long-lasting results. Another option is leather paints, which provide more opacity and can be used for intricate designs or patterns. Additionally, leather stains offer a translucent finish, allowing the natural grain of the leather to show through while still changing its color. Alternatively, you can use natural dyes derived from plants or other organic materials for a more eco-friendly approach. Whichever method you choose, ensure it’s suitable for your leather type and desired outcome for optimal results.
Yes, leather can be dyed a different color. One of the remarkable qualities of leather is its ability to absorb dye and change color effectively. Whether you’re looking to refresh the appearance of an old leather item or personalize a new one, dyeing leather offers a versatile solution. With a wide range of leather dyes available in various colors, you can transform the look of leather goods to match your style preferences or design aesthetics. Whether it’s changing from a light to a dark shade or completely altering the color, dyeing leather allows for endless possibilities to achieve the desired look and feel.
The longevity of leather dye depends on various factors such as the quality of the dye, the type of leather, and how well the dye was applied and sealed. Generally, high-quality leather dyes, when applied correctly, can last for many years without significant fading or discoloration. Proper preparation of the leather surface, thorough application of the dye, and adequate sealing with a protective finish can extend the lifespan of the dye. However, exposure to sunlight, moisture, and frequent use can gradually fade the color over time. With proper care and maintenance, a well-dyed leather item can retain its color vibrancy for several years.
Dyeing leather easily requires careful preparation and the right tools. Start by cleaning the leather thoroughly to remove any dirt or oils that could hinder the dyeing process. Choose a high-quality leather dye in your desired color. Apply the dye evenly using a sponge, brush, or spray, ensuring full coverage. Multiple thin coats are better than one thick coat for a more even finish. Allow each coat to dry completely before applying the next one. Finally, seal the dyed leather with a protective finish to enhance durability and longevity. With attention to detail and patience, dyeing leather can be a straightforward and rewarding process.